 6th May 2011, 10:42 AM
|
#1 |
|
Member
Expert member
Join Date: May 2011
Posts: 51
|
Hello everyone!
I'm new here, and I've searched, but come up empty handed. I'm sorry if this is covered elsewhere! Basically, I'm looking to make a motorsport racing suit for Michael & Victoria 4 in Poser. The thing is, I really don't know where to start! I've made fairly basic objects in the past, but this will be a lot like making a new human figure, in as far as there will be areas with only a few polys, and some with a large number, like where the fabric wrinkles at the joints. All the stuff I've made before has resembled solid state items. Does anyone know of a tutorial on making realistic cloth items and such, please? I aim to make the suit fully conforming, one for M4 and one for V4, if I can make just the one suit, and have morphs, to fit both figures, that would be ideal. Also, things like the belt and collar will hopefully be posable, along with the zip, to open it at different increments. Am I taking on too much here? I'm beginning to think I am, lol! Many thanks everyone! Glen. [EDIT] This is the kind of thing I want to make: http://www.jjcraceandrally.com/Produ...ign=Motorsport Last edited by Glen; 6th May 2011 at 10:49 AM. Reason: Found a useful link, to clarify the motivation for my post. |

|

|
|
6th May 2011, 11:59 AM
|
#2 |
|
Senior Member
Professional user

Join Date: Aug 2005
Posts: 203
|
Hey, I've been working on a character mesh that I (now) intend to rig in Poser, and I did make a one piece swimsuit for it to wear.
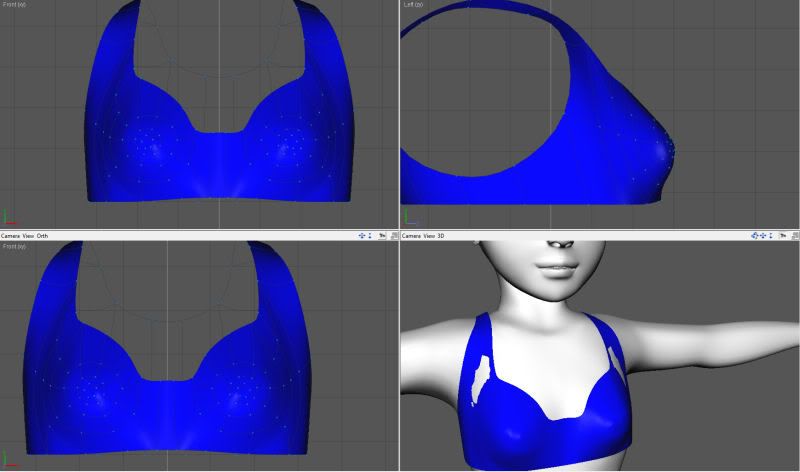
The easiest way to make tight fighting clothing that I've found is to first import the poser figure you want to work with into AC3D. Easiest way I've found to do that is simply load it up, put it in the T position, then export as a .obj and import that into AC3D. Then, to make the tight clothing, select all of the surfaces you want to cover, and copy/paste them right on top of the model. Select the original model and set it to Hidden, then go into your toolbar in the 3D setting and select "Show Hidden Objects". Now, you should see only the duplicate body area you copied/pasted, and not the rest of the figure in your 2D work windows, and see everything in the 3D window. Set your copy/pasted skin to an obnoxious color like blue so you can clearly see in the 3D view where its clipping through the base model. There should be a lot of clipping. In your 2D windows, start selecting vertices and expanding them out into bigger areas. Don't do the entire mesh at once, because it'll just throw off your proportions. Expand a small section until it no longer clips through your base model in 3D mode. Go expand another area until it no longer clips. Do this until you have the entire thing "outside" of the original mesh and you don't see anywhere the base figure is clipping through your new skin. Now you have your base skintight suit to start modifying. First thing you'll want to do is smooth out the muscles. Its obviously going to be a bulkier suit, so you won't be seeing rippling abs through it. Making seems is actually fairly easy, you just have to make a few new slices in the mesh. Slice down the poly's where you wan the seem to be, then simply pull the new row of vertices in towards the middle. To make folds in the fabric, do the exact opposite. Slice where you want to have the fold be, slice a circle around that, then move the middle line out away from the center. That probably sounds a little confusing, so I've uploaded some pictures of the model I'm working on to help illustrate. You can see where I have the swimsuit mesh so close to the actual body that the lines of the navel are half-visible. All I did there was combined the polygons of the skin there to eliminate the belly button entirely. The seams around the edges are even easier. I just extruded some extra space around the holes, cut them away, and made rings out of them. Pushed the rings back up against the edge of the swimsuit, and voila, instant hemlines. Granted, you're going to have a little more work to do since the base model you'll be working with is already in high poly count mode, which means more vertices to cut/move, but the idea will be the same. Just start with a copy of the area you want to cover, make it bigger, smooth out the details, then add in seams/folds/etc. If you want, I can make her a new set of clothing with more step by step pictures.
__________________
It is by caffeine alone that I set my mind in motion. It is by the syrup of cola that thoughts acquire speed, the ears acquire ringing, the ringing becomes a warning. It is by caffeine alone that I set my mind into motion. |
|
|
|
|
6th May 2011, 01:29 PM
|
#3 |
|
Member
Expert member
Join Date: May 2011
Posts: 51
|
Hey, thankyou for your help!
That looks pretty nice, I must say, well done! How do I go about doing the slicing you mention? I think, if I were to be able to remove vertices from the M4 figure, it would probably be a lot less daunting. M4 is insanely high poly, and I just don't need that many polys on my suit. There will be areas of high and low poly, but, for example, around the nipples, it's very detailed. Is there a way of selecting areas like this and reducing the poly count in them? I know how to add vertices, but not how to remove them, lol! Thankyou again for your help, much appreciated! Glen. |
|
|
|
|
6th May 2011, 01:56 PM
|
#4 |
|
Senior Member
Professional user
Join Date: Aug 2005
Posts: 203
|
Okay, I got bored over my lunch break and whipped up a quick set of tutorial pictures. Now, I made this in under an hour, so its pretty rough. Obviously if I spent more time on everything it would look better, but it should give you the idea of how I start out with my clothes.
We'll be making a basic bra/sports top for my most recent model. 1. Block out the basic shape using the mesh you already have. 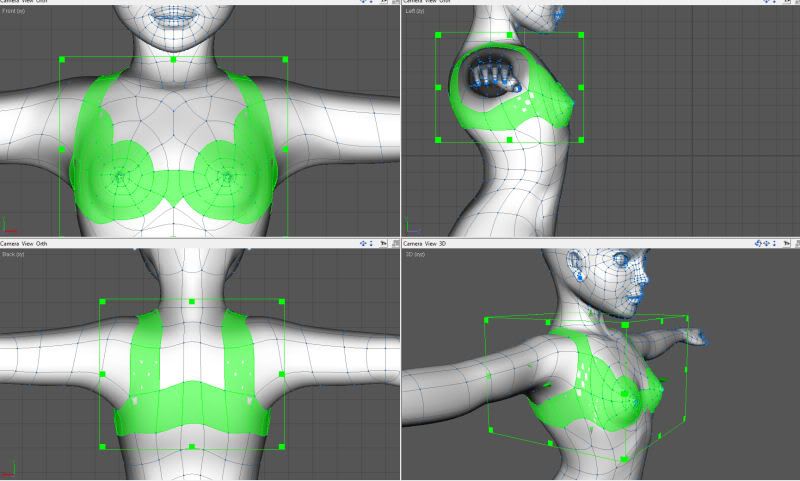 Obviously it won't be perfect depending on your mesh, but the idea is to just get a rough outline. If you were doing a tight jacket, you'd highlight the entire chest and arms. 2. Copy/paste/recolor 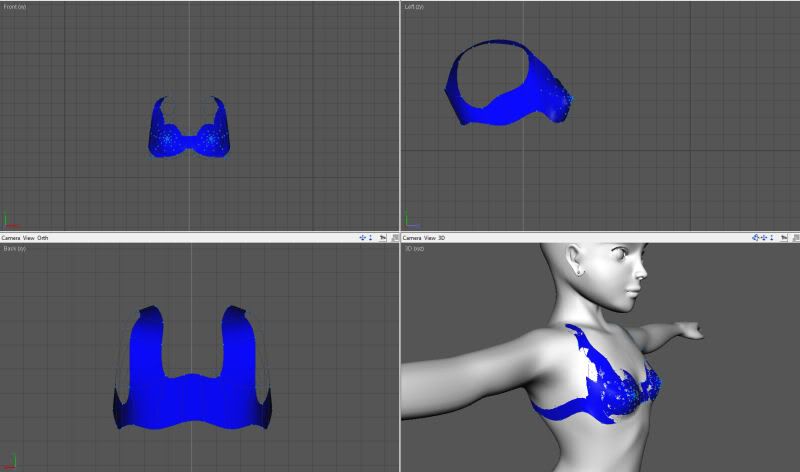 Copy/paste the area you have highlighted as a new object, and make it a very different color so you can see where its crossing through (clipping) the base model. Also, set your base model to Hidden and set your 3D view to Show Hidden. You don't want to mess with the original, but you do want to see how it interacts. 3. Reshape your model. 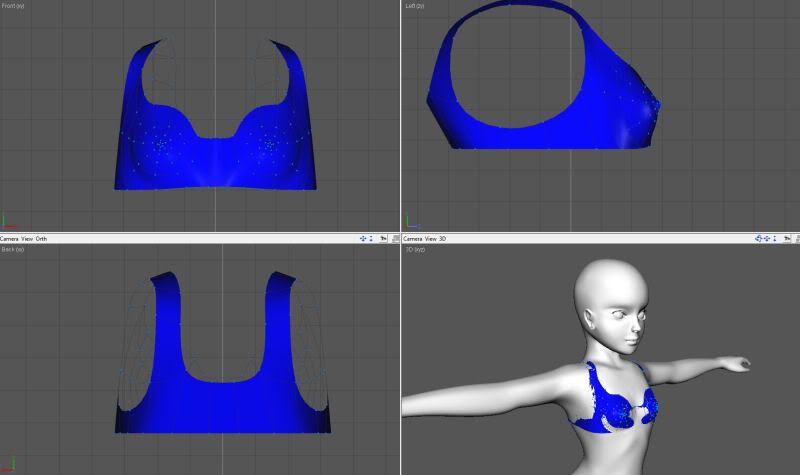 You don't have to get it perfect right now, but move your vetices around until you get the basic shape you want. 4. Start resizing the edges. 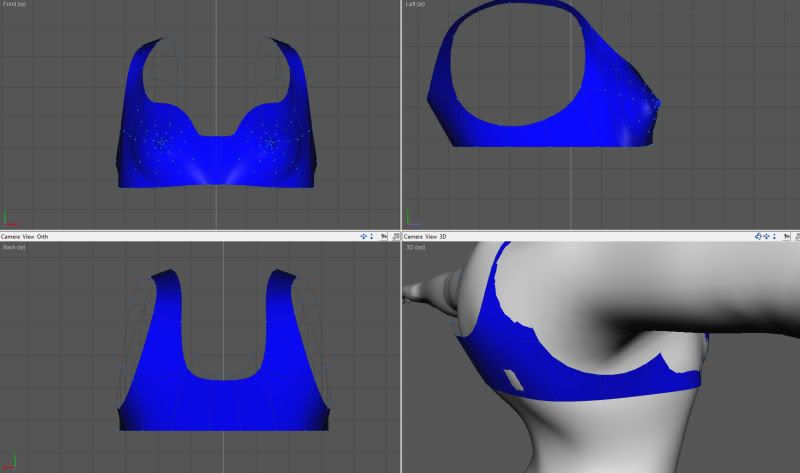 You can't just do a mass enlarge on this, so just go around the edges and start moving the vertices outward so they are no longer inside the base model.
__________________
It is by caffeine alone that I set my mind in motion. It is by the syrup of cola that thoughts acquire speed, the ears acquire ringing, the ringing becomes a warning. It is by caffeine alone that I set my mind into motion. Last edited by Edymnion; 6th May 2011 at 02:00 PM. |
|
|
|
|
6th May 2011, 01:56 PM
|
#5 |
|
Senior Member
Professional user
Join Date: Aug 2005
Posts: 203
|
5. Start smoothing out the details
 Here I've removed the nipples from the new model, and smoothed the area over a bit. 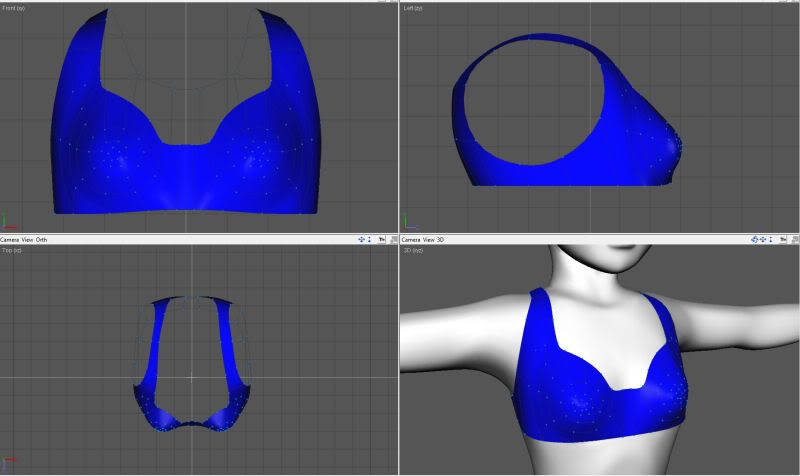 Notice the shoulder area was clipping, and the base mesh didn't have any vertices there to help fix the problem, so I added some and merged a few polys together so I could pull that section out away from the body.
__________________
It is by caffeine alone that I set my mind in motion. It is by the syrup of cola that thoughts acquire speed, the ears acquire ringing, the ringing becomes a warning. It is by caffeine alone that I set my mind into motion. Last edited by Edymnion; 6th May 2011 at 02:15 PM. Reason: Can't spell for beans today. |
|
|
|
|
6th May 2011, 01:57 PM
|
#6 |
|
Senior Member
Professional user
Join Date: Aug 2005
Posts: 203
|
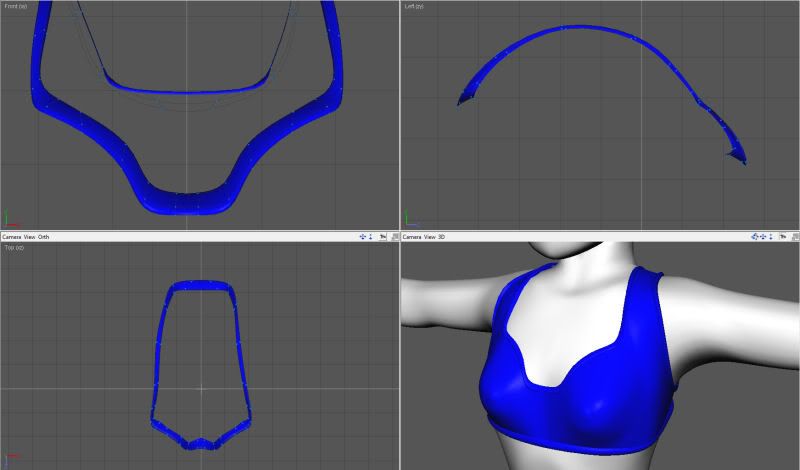
6. Make the hemlines
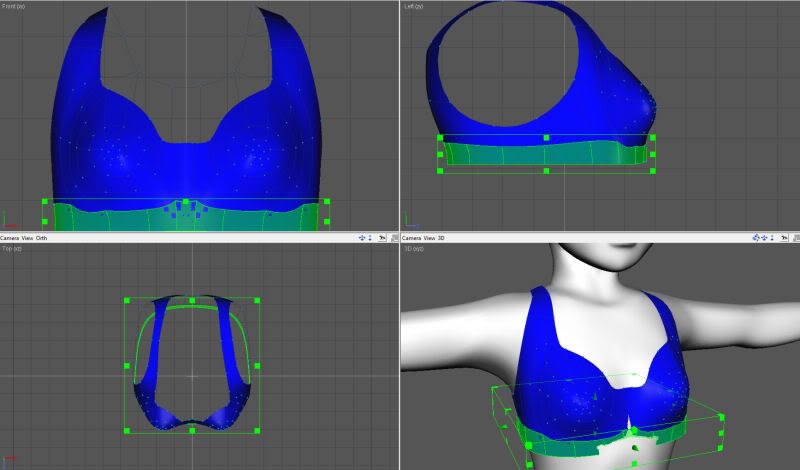 Start by extruding the bottom edge of mesh down to make another row of polys. 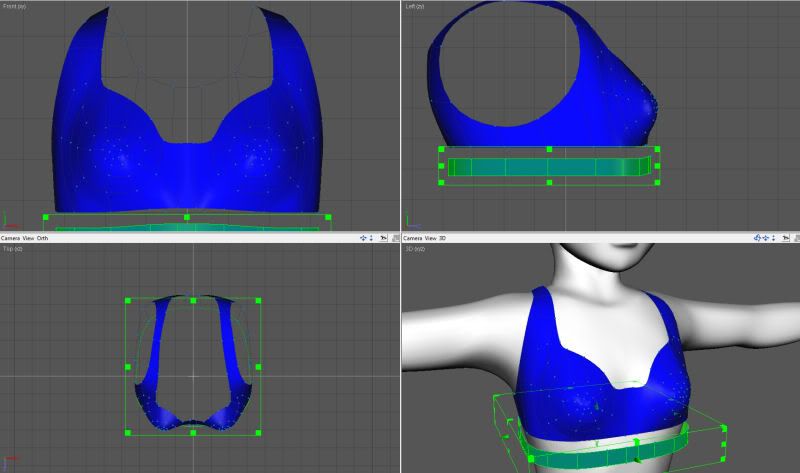 Cut the new row away from the original mesh. 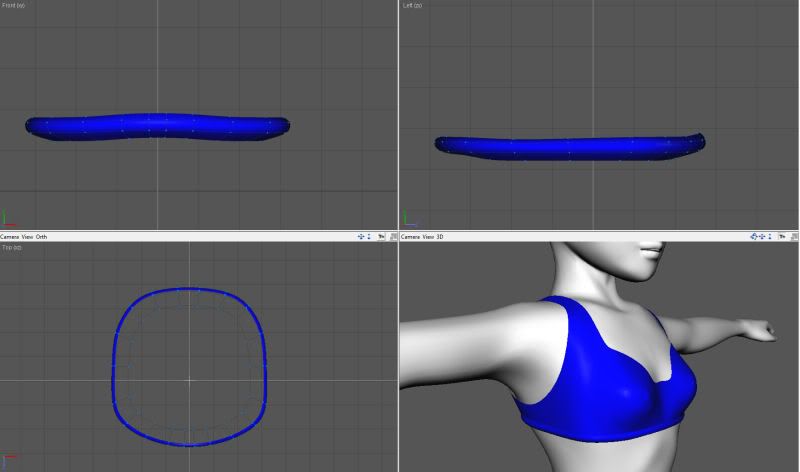 Using the extrude tool, pull the ring out into a half torus (aka a half donut shape). 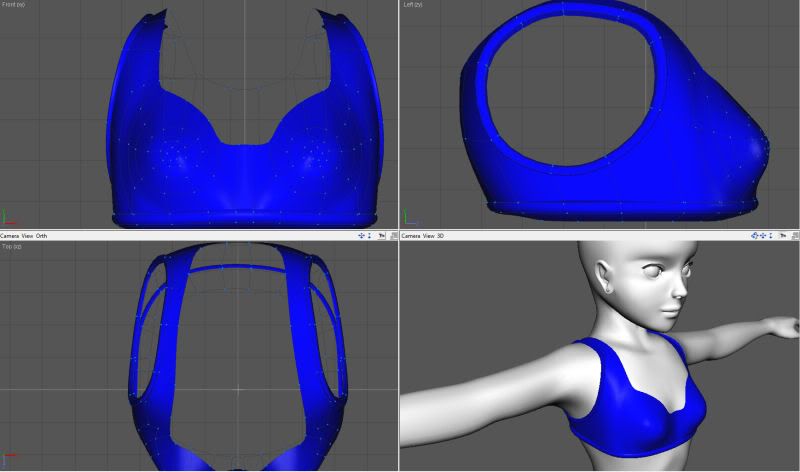 Push the new ring back up against the base of the mesh.
__________________
It is by caffeine alone that I set my mind in motion. It is by the syrup of cola that thoughts acquire speed, the ears acquire ringing, the ringing becomes a warning. It is by caffeine alone that I set my mind into motion. |
|
|
|
|
6th May 2011, 01:58 PM
|
#7 |
|
Senior Member
Professional user
Join Date: Aug 2005
Posts: 203
|
(limit of 4 images per post made me split this one up)
 Repeat for the other openings. 7. Put in the seams. 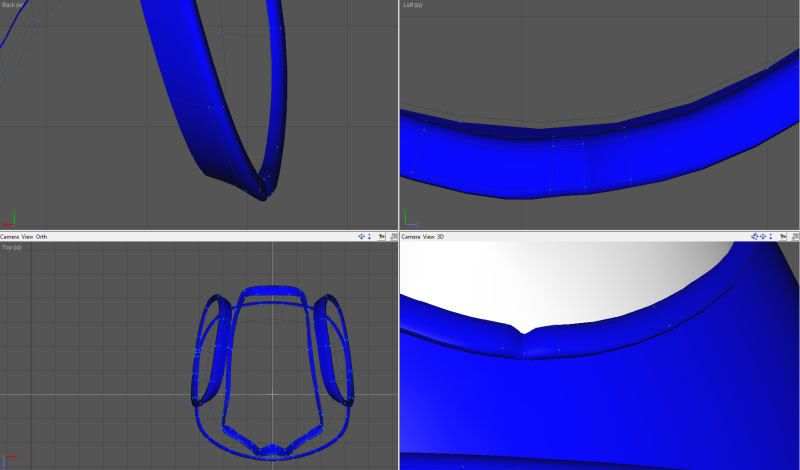 Insert new rows of vertices and cut them to form 3 rows of new lines. Pull the center one in towards the middle of the model. 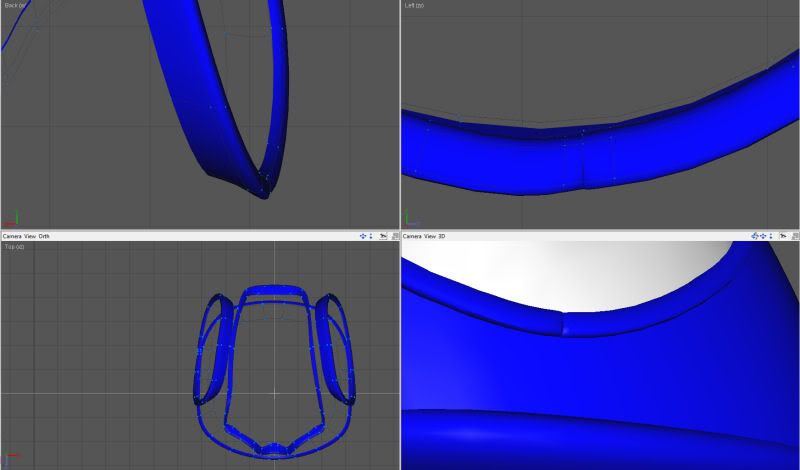 Pull the outter two lines together to where they are almost touching over the center line. Adjust the height of the outside lines if you have one side of the seam bulging out over the other. The closer you get the outter edges together, the harder the seam will appear. If you want it to look looser, just don't move the side lines quite so close together. 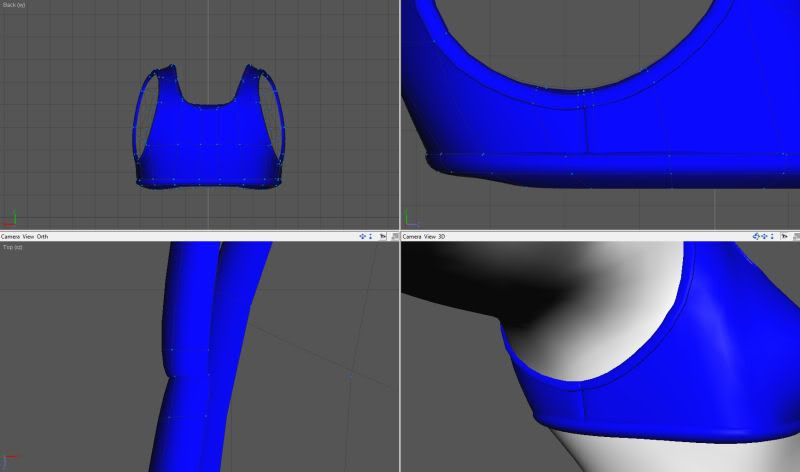 Repeat for the flat sections of the fabric.
__________________
It is by caffeine alone that I set my mind in motion. It is by the syrup of cola that thoughts acquire speed, the ears acquire ringing, the ringing becomes a warning. It is by caffeine alone that I set my mind into motion. Last edited by Edymnion; 6th May 2011 at 02:14 PM. |
|
|
|
|
6th May 2011, 01:58 PM
|
#8 |
|
Senior Member
Professional user
Join Date: Aug 2005
Posts: 203
|
8. Finish it up
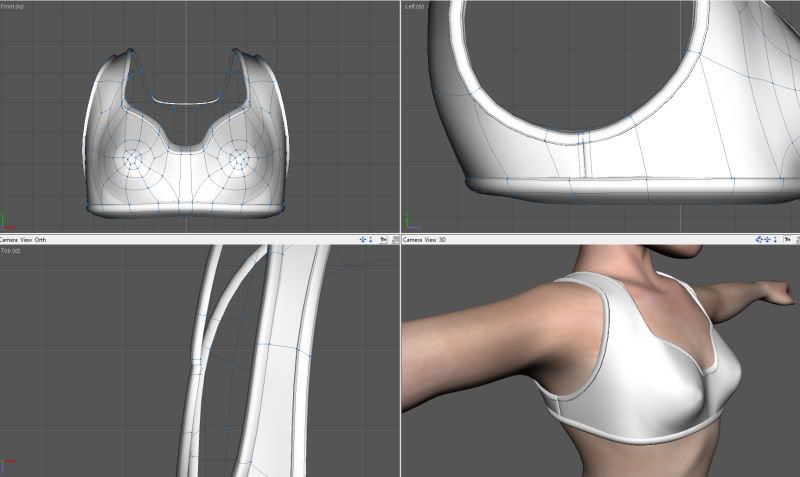 I got a little lazy here and didn't bother sticking the seam in the bottom hemline or put seams across the shoulder straps, but you know how that would work now. Merge the flat portion of the mesh with the rings you created as hemlines, and you're done!
__________________
It is by caffeine alone that I set my mind in motion. It is by the syrup of cola that thoughts acquire speed, the ears acquire ringing, the ringing becomes a warning. It is by caffeine alone that I set my mind into motion. Last edited by Edymnion; 6th May 2011 at 02:04 PM. |
|
|
|
|
6th May 2011, 02:12 PM
|
#9 | |||
|
Senior Member
Professional user
Join Date: Aug 2005
Posts: 203
|
Quote:
Quote:
Quote:
__________________
It is by caffeine alone that I set my mind in motion. It is by the syrup of cola that thoughts acquire speed, the ears acquire ringing, the ringing becomes a warning. It is by caffeine alone that I set my mind into motion. |
|||
|
|
|
|
6th May 2011, 02:19 PM
|
#10 |
|
Member
Expert member
Join Date: May 2011
Posts: 51
|
AHA! I had just typed out a post, asking about using a lower res figure! I think it might work better, as the only really tight bits on the race suit are the cuffs and ankles. It'll be a different story for the boots, and another entirely for the gloves, lol!
Well, if I can get this all made properly, you're welcome to them! I doubt I could sell them on Rendo, as they apparently need tons of details on your accounts and stuff, which I don't have. :-/ |
|
|
|
 |
|
|


 Linear Mode

