 6th May 2012, 10:45 PM
|
#11 | |
|
Member
Expert member
Join Date: Feb 2012
Posts: 58
|
Quote:
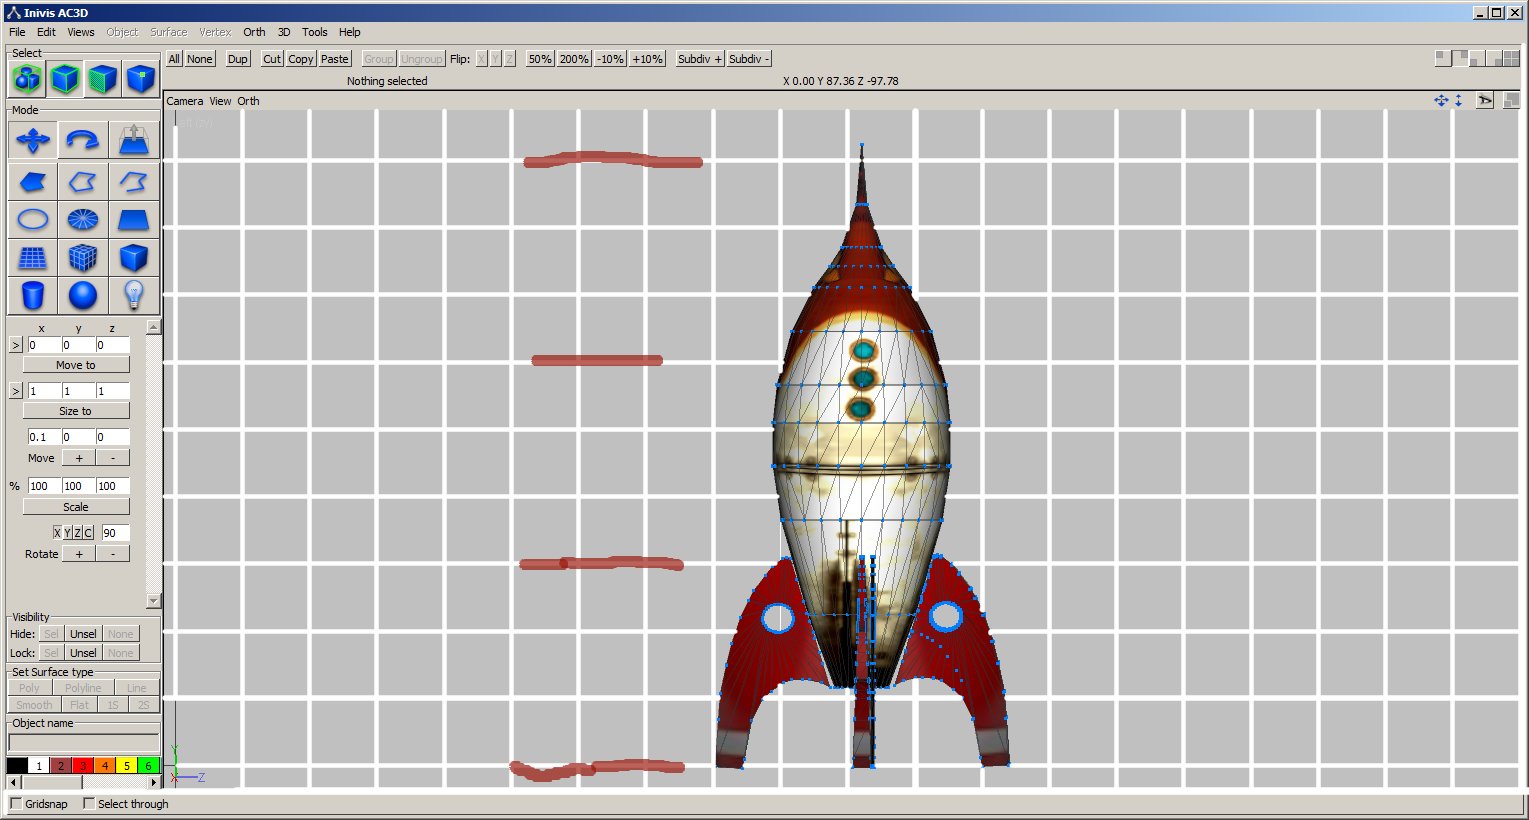
you are quite right about the nose cone, I'm not worried about that at all. its the windows, the doors, the rivets, and the "buzz lightyear!!!" with a lightening bolt that spans 3 or 4 of the conic sections and takes up 6 of the 24 segments of a conic section that is my problem. I think the answer is in the "4 view"/ "peeled banana" view you made of my rocket. BTW, how did you get that view? |
|

|

|
|
7th May 2012, 12:11 PM
|
#12 |
|
Senior Member
Professional user

Join Date: Feb 2004
Location: Portland, OR
Posts: 604
|
How'd I get that view? I created it from cut up copies of your model (copies, so I don't destroy the original). I arrange them in another visual area of the modeling space and then take a screen shot of the results. To be more complete:
1) Figure out a way to display the object(s) such that you can view as many faces as close to "straight on" without visual distortion. For a cylinder, four quarters of the object should enable you to get the job done. For aircraft fuselages, the rather apt object you alluded to earlier, that's exactly what I do: create a left, bottom, right, top arrangement along the aircraft's axis. In Surface Select Mode, select one, 1/4 section of the object. COPY & PASTE those surfaces as a new object, then drag it somewhere away from the original. Doesn't matter where, just out of the way so you don't get confused about what you're looking at in any of the viewports. Using the rotate tool, rotate the "1/4 object" until it faces the viewport you'll use to take your screen grab: being 1/4 of the part, that will likely be in 45 degree increments. 45, 90, 135, 180, 270. Watch the numerical readout as you do the rotation to make sure you rotate exactly. You may need to set your preferences to get the proper granularity you want to help you rotate easily. You may also need to make your object 2-sided, in case it seems to 'disappear' in the viewport. Select and repeat the process with the other 3 quadrants, making sure to carefully align the sides of the object that do NOT "separate" like the banana, near the vertical center of the object. If you decide that the best way to do the nose cone is to shoot it from above, you can use the same method, albeit in the top view, to make a copy of the nose cone, then rotate it, so that it faces straight on from the view you're using to assemble the body. Take care to orient the view so that you can tell which side will eventually align with the rest of the body. Finally, if your final destination (game, as an example) requires square or power-of-2-sized graphics for its textures, I'd create a perfect square that can enclose all the objects. Place it in position and then "Lock" it, such that it does not obscure the view, but the outline of the square is visible. Then, once you've arranged all your graphics (you'll likely want copies of the fins, right?) and put them in the square.... turn the grid off in that viewport, and use a screen grab utility (if you're on Windows 7, Snipping Tool works wonders) and grab the outline of your square to create your graphics guide. Make sure to resize it to a size that will work for you (ex., 512 pixels square, 1024 pixels square, 512 x 256, etc., depending on the requirements of your project's graphic req's). As I said, if none of this makes sense  PM me and I'll be glad to arrange a time to demo it for you on Skype. PM me and I'll be glad to arrange a time to demo it for you on Skype.
__________________
Flight Sim Project Contributor My Gaming Rig: i5 2500K Quad-Core CPU at 3.3GHz MSI P67A-C43 mobo 4GB of PC12800 DDR3 memory Windows 7 1GB Galaxy GeForce GTX550 Ti video card GeForce 270.61 drivers (4/2011) Cougar joystick/throttle combo CH Pedals |
|
|
|
|
7th May 2012, 03:19 PM
|
#13 |
|
Member
Expert member
Join Date: Feb 2012
Posts: 58
|
I'm starting to understand. thanks Stiglr. I don't know how to skype so I'm gonna stick to email for now. It also helps to document this stuff.
I think I've got you, look what I was able to do listening to your advise: I got a front view of a section, duplicated it, and then pasted a .png picture with an invisible background, whahhh Laaah.... I can now paste nose art onto the model. I did just like you said, made a duplicate, lifted if off, added its own texture, in this case some noseart, and then lowered it back onto the model. Great technique. on the planet logo, I had to rotate the section, then re-align the uv map to fix the warped section. its not perfect, but a lot better. |
|
|
|
|
10th May 2012, 06:42 PM
|
#14 |
|
Senior Member
Professional user
Join Date: May 2005
Location: Norway
Posts: 883
|
Very easy and understandable explanation Stiglr. Great for beginners.
__________________
..............<<<<My Blog>>>>........... |
|
|
|
|
18th June 2012, 08:45 AM
|
#15 |
|
Member
Expert member
Join Date: Feb 2012
Posts: 58
|
Hey everyone thanks for your input, I was able to complete the project:
 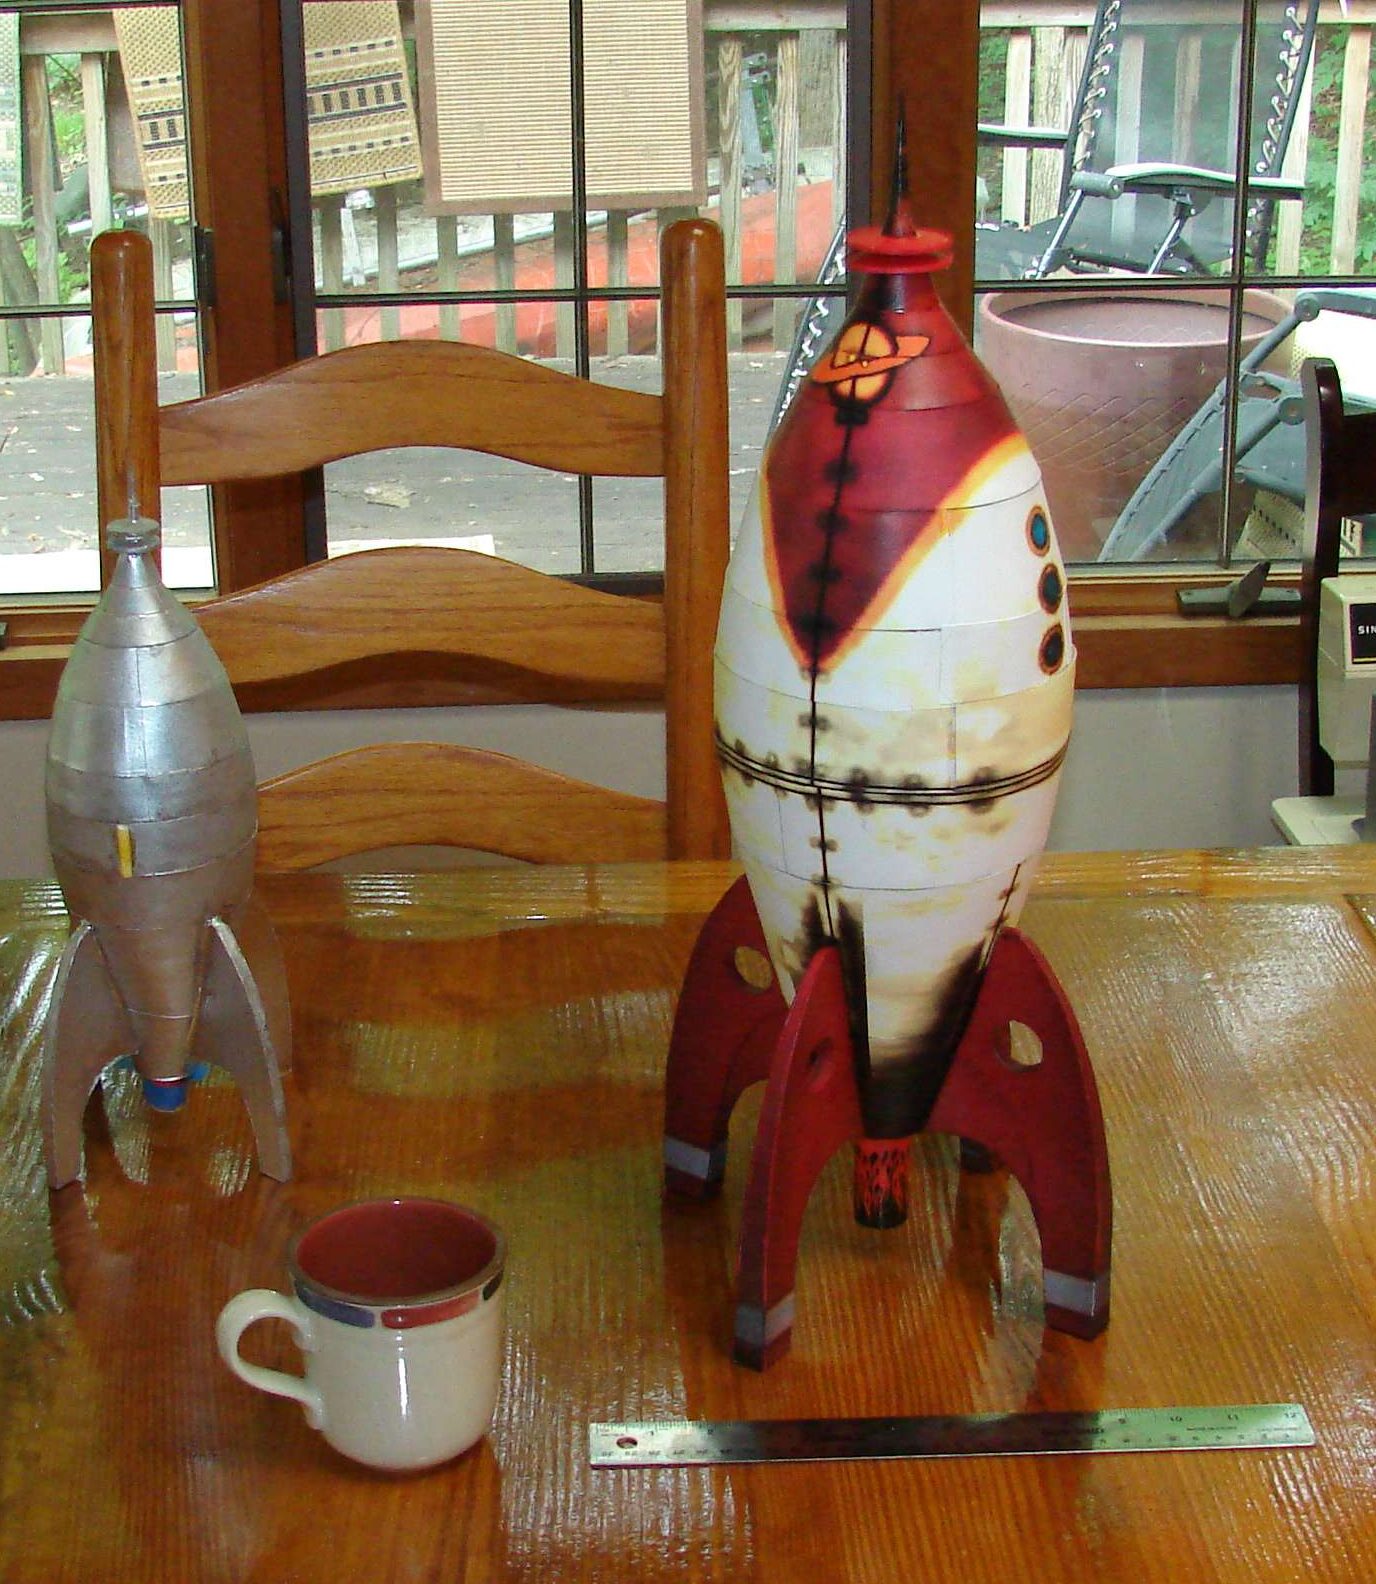 Stiglr a special thanks to you to for your expert instructions!!! You are going to make a lot of kids happy with it. - Jon Last edited by jleslie; 18th June 2012 at 08:52 AM. |
|
|
|
|
18th June 2012, 11:10 AM
|
#16 |
|
Senior Member
Professional user
Join Date: Feb 2004
Location: Portland, OR
Posts: 604
|
That's what it's all about, innit? Making people happy?
So glad I could help!
__________________
Flight Sim Project Contributor My Gaming Rig: i5 2500K Quad-Core CPU at 3.3GHz MSI P67A-C43 mobo 4GB of PC12800 DDR3 memory Windows 7 1GB Galaxy GeForce GTX550 Ti video card GeForce 270.61 drivers (4/2011) Cougar joystick/throttle combo CH Pedals |
|
|
|
 |
|
|


 Linear Mode

