|
|
|
|
Poser Morph Target assist for AC3DReleased under the GNU LESSER GENERAL PUBLIC LICENSE.
Download Windows version
Changes in version 1.0.1:
IntroAC3D is a great editor for creating Poser content. It's very intuitive, easy to learn, and powerful. The only geometry it hasn't been able to tackle is Morph Targets. This is because AC3D does not guarantee that exported geometry will come back out in the same exact order it went in. If I load a model of a triangle with 3 vertices from an OBJ file into AC3D, the vertices may go in as {0,0,0 : 0,1,0 : 1,0,0}, but when you save it back out as an OBJ file, they may come back out as {1,0,0 : 0,0,0 : 0,1,0} (due to performance-optimized loading methods, the geometry will often end up in the exact reverse order coming out as going in). For most applications, this doesn't pose any problems. The vertices are still there in the same locations, and the triangle still renders correctly to the screen, but the ordering is just different. But Poser morph targets have a scrict requirement that the vertices stay in the same order. Therefore, AC3D hasn't traditionally been a utility for creating morph targets. Poser Morph Target assist (PMT) for AC3D was created to allow AC3D to be used for morph target editing. The PMT plugin works by keeping track of all of the vertices loaded from a .obj file. Once loaded, the original vertex orders are "remembered" by PMT. When you have modified your geometry and are happy with your morph target, you will export through the PMT interface, and PMT will write the original vertices out in the order they were loaded. This document covers some very important aspects of morph target creation with AC3D and PMT, so please read the section "Editing files" at the very least before working with morph targets in AC3D.
InstallationCopy the pmt.tcl and pmt.p files to your AC3D plugins folder (for example, if using Windows, C:\Program Files\AC3D5\plugin) and (re)start AC3D. You will find the "PMT : Poser morph target assist..." menu item under the "Tools" menu. Click the "PMT : Poser morph target assist..." menu item under the "Tools" menu to bring up the PMT interface.
Editing files
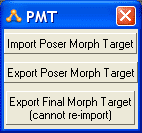
Importing morph targetsThe only way to load morph targets is by using the "Import Poser Morph Target" button on the PMT window. You cannot load morph targets using the File -> Open or File -> Import commands. These functions bypass the PMT plugin.
Exporting morph targetsYou can save morph targets by using the "Export Poser Morph Target" button on the PMT window. You cannot save morph targets using the File -> Save or File -> Export commands. These functions bypass the PMT plugin. If any vertices have been added to or deleted from your object since your last Import, you will not be able to export the file using PMT. Often you can Undo whatever steps you took that threw PMT off track, but note that there are some functions that basically render PMT useless (see "Do not use with PMT" under "Performing other operations", below). Use the "Export Poser Morph Target" for most of your saves. If you are working on a morph target that's taking you a while to finish and you have to leave/end your editing session, save using this function, then you can use the "Import Poser Morph Target" to reload it at a later time. If you'd like to save a compact version of your morph target to conserve space, export the object using "Export Final Morph Target". This will only save the vertices from your document. This creates a valid morph target file for Poser, but you will not be able to reload all of the surfaces/materials back into AC3D using this file.
Rearranging geometryYou can move, size, or rotate any geometry in a morph target as you wish. You can texture your object, apply new materials, reverse face normals, etc., but this will not be picked up when you re-import the morph target into Poser. The only thing that is considered in a morph target is the position of each vertex in your object. PMT can save the materials and faces, however, in case you need to reload a morph target you've been working on into AC3D at a later date (see the previous section on Exporting morph targets).
Deleting geometryYou cannot delete vertices for a morph target. Even if you replace them with brand new vertices, PMT needs the original vertices, not replacements. However, if you accidentally hit the delete key, simply perform an Undo, and your vertices will be fine again.
Adding geometrySometimes you may need create/load some additional objects/shapes to serve as a visual guide for editing. However, you cannot save this additional geometry through PMT. If you need to keep some non-morph geometry intact, however, you can always select the new geometry and perform a "File -> Save Selection...". This way, if you need to leave the model and come back to it later, you can reload your original morph target through PMT, then perform a "File -> Import" to load the additional geometry back in.
Performing other operationsBelow are some of the functions that you can perform on your morph targets within AC3D. Legal
Of course, any functions that do not change geometry should work as well. Below are some of the functions that you can perform on your morph targets within AC3D, but the effects of these functions will not be realized in your morph targets. Legal, but not very useful
Most other functions that change/add/delete geometry will invalidate your morph target to the point where PMT will not export it. Many of these functions can be "undone". However, there are functions in AC3D that will cause your PMT file to be "un-exportable", even after an Undo. Do NOT use these functions on a morph target. If you perform any of these functions, PMT cannot export your data, even after an Undo. It's worth noting that these functions work very well if you're *not* making a morph target. PMT just loses the vertex reference during these operations. Do not use with PMT
NOTE: The best way to find out whether a function or a plugin will cause problems in your morph target is to try to use the function on a test morph target, then immediately try to perform an export through PMT. If PMT does not complain, then the function/plugin didn't cause any problems.
Known issues and limitationsNone of the limitations listed in this section will interfere with the functionality of your morph targets. They are listed for informational purposes only. Importer:
Exporter (normal):
Future enhancementsThe following enhancements may appear in future versions:
Example : Editing a morph targetThis example was created using Poser 6, but custom morph targets are possible using (at least) Poser 3 and up. The command names and particulars of exporting/importing morph targets in Poser may have changed, of course. Consult your Poser manual when in doubt. I believe there are also published documents on the internet that discuss morph target creation for Poser 3, where, if I recall correctly, morph target imports were not quite as pretty/easy... At any rate, the first step is to export some geometry to use as a morph target. I'm using the "Business Man" model, who's head has been around since Poser 3, but you can use any model you'd like.
With the model loaded, perform a File -> Export -> Wavefront OBJ. If asked for a range to export, select "Single frame". If provided a "Hierarchy Selection", deselect all objects except the object you want to morph. We do this by unchecking "UNIVERSE" at the top, then checking "Head" within the figure's hierarchy.
After being prompted to save your OBJ file, you will be prompted with yet more options. In poser 6, you can uncheck all options except "As Morph Target (no world transformations)"
Now launch AC3D and bring up PMT from the Tools menu. Click the "Import Poser Morph Target" and open the file you just exported from Poser. With the figure loaded, go into Vertex mode in AC3D.
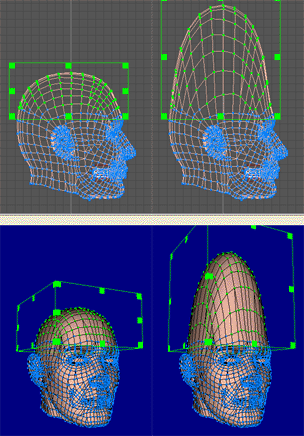
in the "Left" view, Select the vertices on the top of the figure's head using the mouse (drag a square selection over the vertices). Next, grab the top/center handle of the selection and drag upward until you have a cone head:
This was easy enough to affect, but you can perform as many complex moves/scales/rotations as you'd like. Now, click "Export Poser Morph Target" in the PMT window and save this morph (you can overwrite your old save or create a new one). Now, back to Poser, load up your same model again if you closed Poser and re-select the head. With the head selected, perform an Object -> Load Morph Target.
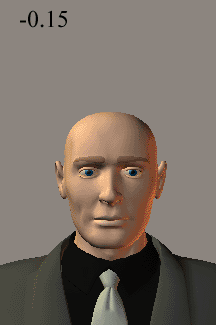
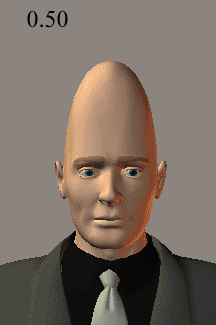
Load up the morph target you exported from AC3D and type a descriptive label (I used "Conehead"), then click OK. You should now have a "Conehead" morph for the figure's head, which you can tweak using the dial, getting varied levels of effect:
As with all of my plugins, if you have problems or need assistance, contact me (Dennis) at the AC3D forums (www.ac3d.org/forum) |
| All content Copyright © 2006 Dennis Hawthorne, except where explicitly noted supercoldmilk © 2006 Dennis Hawthorne |
||