|
|
|
|
Wave for AC3DReleased under the GNU LESSER GENERAL PUBLIC LICENSE. Download Windows version 1.1 * NOTE: The RedHat version contains all source code as well as its own README. ** NOTE: This Linux version was compiled and linked on a Gentoo x86 install. If this does not work for you, the source code has been proven to compile/link under Linux, so you may wish to download the source code and compile for your system. Transforms the selected vertices using an axis-aligned waveform. See below for examples and usage This plugin and code are freely distributable AC3D versions prior to version 5 have not been tested with this script. History2006/06/26
2006/03/16
InstallationCopy the wave.tcl and wave.p files to your AC3D plugins folder (for example, if using Windows, C:\Program Files\AC3D5\plugin) and (re)start AC3D. You will find the "Wave..." menu item under the "Tools" menu.
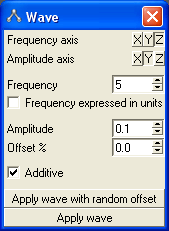
DescriptionWave is an AC3D plugin that allows you to transform your selected vertices using a waveform. This plugin was originally created for adding simple curves/sweeps to surfaces, such as warping panels and boards, but many interesting shapes can be derived. The interface options are as follows:
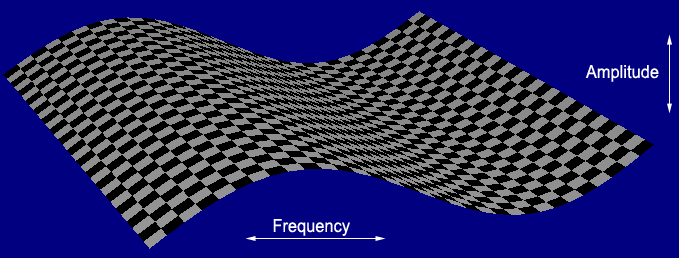
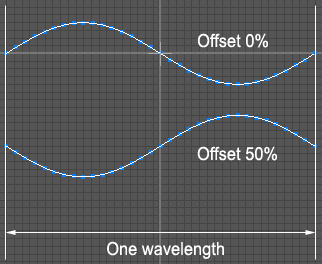
Frequency, amplitude, and offset
ExamplesNOTE : All examples below were created using version 1.0 of the Wave plugin, before the "Frequency expressed in units" option was added. To recreate the examples below, ensure the "Frequency expressed in units" box is checked. Note that generally, however, you will probably want to leave this box unchecked, as it is often better to predict results when applying frequency to a selection rather than by AC3D units.Example : Creating a waveformIn this example we'll show a simple waveform transformation onto vertices. First, create a horizontal line with only two points in the Front (XY) view. Make the line four units wide. 6 Next, with the line selected, press Ctrl+Shift+I (or in the menu use "Vertex->Insert Vertex") a total of six times. You should have a line like the one below. Select the "Wave..." menu item under the "Tools" menu. This brings up the Wave interface. Set the following options:
If you followed these steps, you should have only had to change the Amplitude for this example. Clicking Apply wave at this point should give you the following shape in the Front (XY) view. The red lines drawn on this image show one waveform - my "major" grid is set to one unit, and you'll see that a complete wave stretches over one unit (because my frequency is set to 1).
Example : Expanding the shapeLet's take this same shape and perform some more wave transformations on it. With the same line you've just created still selected, Apply a new wave. Change the following settings from the last wave:
Now, Undo the last waveform we applied and change the Frequency axis to 0.25, then apply the waveform. Because our line is 4 units long, this means we'll only be applying one waveform (1/4). This gives us: Now, Undo this last change. Set the Amplitude axis back to Y, the Offset % to zero, and leave the frequency and amplitude the same as the last step (0.25 and 0.3). This time, check the Additive checkbox and apply the waveform.
Note : Applying waves to objectsBelow is a waveform applied to a segmented cylinder (the cylinder was made by extruding the top face of a normal cylinder using the numeric extrude tool). In order for this to work, however, you must use the Additive option. Otherwise, all vertices will snap together along the frequency axis. Experiment with other settings to get more shapes and styles.
Example : Creating a cartoon fence The above fence was created in moments using the random waveform feature ("Apply wave with random offset"). A cartoonish fence is shown because it better illustrates the function, but subtle, random warping of objects is just as possible. To achieve this effect, I first created a fence composed of segmented slats. The first slat was created by making a small section and extruding it upward until I had the height I wanted. This slat was duplicated across to make a perfectly aligned fence wall. I added a very small amount of space between each slat, and added two horizontal slats behind the fence wall. Finally, I set the surface type to "Smooth" so that any curves applied would not be faceted. My fence ended up being about 5 units wide and 3 units tall. The flat part if the fence faced the Front view (XY axis). I selected the vertical slats and brought up the Wave tool. I set my Frequency Axis to Y, the direction that the slats went vertically. The Amplitude Axis was set to Z, because I wanted the fence to boards to have a wavy "in and out" look. The Frequency value was set to 0.25. This means that an entire waveform would stretch across 4 units (my fence was only 3 units tall). I wanted there to be no more than one wavelength applied. The Amplitude value was set to 0.05. This gives the extreme "in and out" bowing against the rear horizontal slats. The Additive checkbox was enabled. Without this, the vertices would have snapped together in the Y direction. Finally, I clicked the "Apply wave with random offset". This function ignores the Offset value and picks a random offset for each selected object. If I didn't like the random pattern that the function provided, I could Undo and try again until it was acceptable. NOTE: if all of these slats had been in a single object, I would not have achieved this randomness --- all slats would have had the same random waveform applied. Randomness here is on a per-object basis. Next, I wanted to bow the boards slightly from "side-to-side". Otherwise, if the camera faced the fence directly it would look perfectly straight. To achieve this effect, I changed the Amplitude to 0.01 and set the Amplitude Axis to X. All other values were left as they were after the first step. I used the random apply again. Finally, I wanted to give the boards uneven heights. To achieve this effect, I changed the Frequency Axis to X, the Amplitude Axis to Y, the Frequency to 0.1, and Amplitude to 0.02. All other values were left as they were after the previous step.
History
2005/07/10
|
| All content Copyright © 2006 Dennis Hawthorne, except where explicitly noted supercoldmilk © 2006 Dennis Hawthorne |
||